SMS Blog
Setup of Ansible on Eve-NG
By George Djaboury, Senior Network Engineer, SMS
Introduction
The purpose of this post is to perform a basic setup of Ansible on Eve-NG. If you are a network engineer who has never been exposed to Ansible before, then this is perfect for you. By the end of this tutorial, you will be able to successfully push configurations to network devices via Ansible, and you’ll have the building blocks to begin constructing your own playbooks. Let’s get started!
Prerequisites
- Eve-NG installed
- Ubuntu Server VM installed and has IP connectivity to the internet and routers in the lab environment.
- Router images must support SSH – Cisco images must have “k9” on the OS name
Images Used
- “Linux-ubuntu-18.04-server” – downloaded from the Eve-NG website. They have several Linux images (mostly out of date). Updating images after installation is always recommended. I updated the image to the latest version – Ubuntu Server 22.04 LTS. Eve-NG also supports custom images.
- Routers1 and 2 (CSRv): csr1000vng-universalk9.16.03
- Router3: c7200-adventerprisek9-mz.152-4.M7.bin
- Switch: i86bi-linux-l2-adventerprise-15.1b.bin – any layer 2 image will be sufficient
Topology
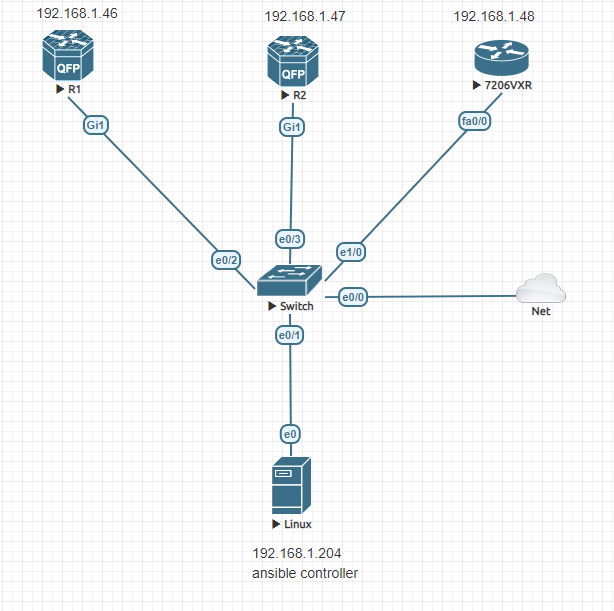
The Eve-NG topology is simple, but you don’t need much get started pushing configurations with Ansible.

Cloud
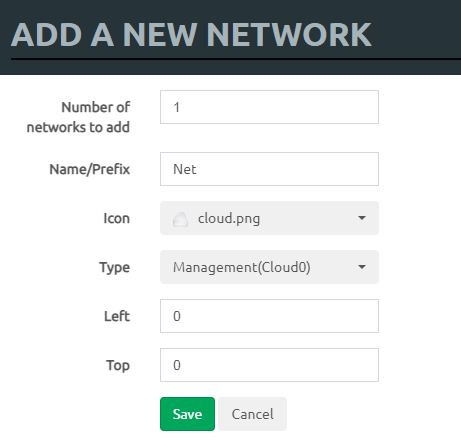
Inserting a “Network” type object is required for internet access. The Linux server just needs to be able to pull updates and download Ansible. I used the “Management(Cloud0)” type in this lab.
Add an object -> Network

Verify Connectivity
Ensure the Linux server can ping all Routers before proceeding
root@ubuntu22-server:~# ping 192.168.1.46
PING 192.168.1.46 (192.168.1.46) 56(84) bytes of data.
64 bytes from 192.168.1.46: icmp_seq=1 ttl=255 time=2.04 ms
64 bytes from 192.168.1.46: icmp_seq=2 ttl=255 time=1.58 ms

root@ubuntu22-server:~# ping 192.168.1.47
PING 192.168.1.47 (192.168.1.47) 56(84) bytes of data.
64 bytes from 192.168.1.47: icmp_seq=1 ttl=255 time=1.97 ms
64 bytes from 192.168.1.47: icmp_seq=2 ttl=255 time=1.66 ms

root@ubuntu22-server:~# ping 192.168.1.48
PING 192.168.1.48 (192.168.1.48) 56(84) bytes of data.
64 bytes from 192.168.1.47: icmp_seq=1 ttl=255 time=1.94 ms
64 bytes from 192.168.1.48: icmp_seq=2 ttl=255 time=1.67 ms
Enable SSH on Routers
A basic configuration is needed to enable SSH. Ansible utilizes SSH by default to connect to all hosts.
Router(config)#username cisco privilege 15 secret cisco
Router(config)#vRouter(config)#hostname R1
R1(config)#ip domain name test.com
R1(config)#line vty 0 15
R1(config-line)#login local
R1(config-line)#transport input ssh
R1(config-line)#exit
R1(config)#crypto key gen rsa
The name for the keys will be: R1.test.com
Choose the size of the key modulus in the range of 360 to 4096 for your
General Purpose Keys. Choosing a key modulus greater than 512 may take
a few minutes.

How many bits in the modulus [512]: 2048
% Generating 2048 bit RSA keys, keys will be non-exportable...
[OK] (elapsed time was 5 seconds)

R1(config)#ip ssh version 2
Verify crypto keys are generated:
R1#show crypto key mypubkey rsa
Verify SSH from Ubuntu Server to Routers
Ansible requires the crypto keys of the remote devices before it can connect via SSH. Let’s see if we can SSH.
root@ubuntu22-server:~# ssh cisco@192.168.1.47
Unable to negotiate with 192.168.1.47 port 22: no matching key exchange method found. Their offer: diffie-hellman-group-exchange-sha1,diffie-hellman-group14-sha1
Looks like SSH failed since the images in my lab use older algorithms that is not compatible with Ubuntu Server 22.04 LTS. To get around this, we have to create the user SSH configuration file and insert compatible ciphers/algorithms.
root@ubuntu22-server:~# vi ~/.ssh/config
KexAlgorithms +diffie-hellman-group14-sha1
Ciphers +aes128-cbc
~
Restart SSH and try again.
root@ubuntu22-server:~# sudo service sshd restart
root@ubuntu22-server:~# ssh cisco@192.168.1.47
Unable to negotiate with 192.168.1.47 port 22: no matching host key type found. Their offer: ssh-rsa
SSH still failed. I’ll need to add the ssh-rsa key type in the config file based on what the router is offering
root@ubuntu22-server:# vi ~/.ssh/config
KexAlgorithms +diffie-hellman-group14-sha1
Ciphers +aes128-cbc
PubkeyAcceptedAlgorithms +ssh-rsa
HostKeyAlgorithms +ssh-rsa
Save the file, restart SSH, and give it another try.
root@ubuntu22-server:~# sudo service sshd restart
root@ubuntu22-server:~#
root@ubuntu22-server:~# ssh cisco@192.168.1.46
The authenticity of host '192.168.1.46 (192.168.1.46)' can't be established.
RSA key fingerprint is SHA256:IaXpnjoCJTZv9RKNTCEzHCajJB+ppaLc3VVgzb8ATqs.
This key is not known by any other names
Are you sure you want to continue connecting (yes/no/[fingerprint])? yes
Warning: Permanently added '192.168.1.46' (RSA) to the list of known hosts.
(cisco@192.168.1.46) Password:

R1#
It worked! Now SSH to your remaining Routers.
If you need to remove a learned key in Ubuntu for some reason (e.g. SSH key changed), then type:
ssh-keygen -f "/root/.ssh/known_hosts" -R "192.168.1.46"
We are now ready to setup the server with Ansible!
Installation and Setup of Ansible on Ubuntu
The first step is to update the server to the latest version.
sudo apt update
sudo apt upgrade
To install Ansible, it’s best to follow instructions on Ansible Documentation website.
sudo apt install software-properties-common
sudo add-apt-repository --yes --update ppa:ansible/ansible
sudo apt install ansible
Verify Ansible installation by checking the version:
root@ubuntu22-server:/etc/ansible# ansible --version
ansible [core 2.12.6]
config file = /etc/ansible/ansible.cfg
configured module search path = ['/root/.ansible/plugins/modules', '/usr/share/ansible/plugins/modules']
ansible python module location = /usr/lib/python3/dist-packages/ansible
ansible collection location = /root/.ansible/collections:/usr/share/ansible/collections
executable location = /usr/bin/ansible
python version = 3.10.4 (main, Apr 2 2022, 09:04:19) [GCC 11.2.0]
jinja version = 3.0.3
libyaml = True
Additionally, we need to install LibSSH, needed to connect to network devices, and is replacing paramiko.
sudo apt install python3-pip
pip install --user ansible-pylibssh
Creating the inventory file
The /etc/ansible file directory should have been created; if not, create it. Navigate to the ansible directory and view its contents. The ‘hosts’ file is the default Ansible inventory file.
root@ubuntu22-server:~# cd /etc/ansible/
root@ubuntu22-server:/etc/ansible# ls
ansible.cfg hosts
Now let’s add our routers in the hosts file:
root@ubuntu22-server:/etc/ansible# sudo vi hosts

[iosrouters]
r1 ansible_host=192.168.1.46
r2 ansible_host=192.168.1.47
r3 ansible_host=192.168.1.48

[iosrouters:vars]
ansible_network_os=cisco.ios.ios
ansible_connection=ansible.netcommon.network_cli
ansible_user=cisco
ansible_password=cisco
It’s a good idea to use groups by enclosing the group name in brackets[]. The first group comprises of all our lab IOS routers. The second group defines the variables for the iosrouters group. For a lab environment, it’s ok to insert plain-text creds in here.
After saving the inventory file, you can verify variables have applied to each host:
root@ubuntu22-server:/etc/ansible# ansible-inventory --list -y
all:
children:
iosrouters:
hosts:
r1:
ansible_connection: ansible.netcommon.network_cli
ansible_host: 192.168.1.46
ansible_network_os: cisco.ios.ios
ansible_password: cisco
ansible_user: cisco
r2:
ansible_connection: ansible.netcommon.network_cli
ansible_host: 192.168.1.47
ansible_network_os: cisco.ios.ios
ansible_password: cisco
ansible_user: cisco
r3:
ansible_connection: ansible.netcommon.network_cli
ansible_host: 192.168.1.48
ansible_network_os: cisco.ios.ios
ansible_password: cisco
ansible_user: cisco
ungrouped: {}
Creating a Playbook
All playboooks must be written in YAML format with .yml or .yaml file extension.
Create a “playbooks” folder and a new playbook file. This playbook is using the “ios_config,” “ios_static_route,” and “ios_banner” modules. This playbook defines 4 different tasks.
root@ubuntu22-server:/etc/ansible# mkdir playbooks/
root@ubuntu22-server:/etc/ansible# vi playbooks/initial-config.yaml
---
- name: initial configuration
hosts: iosrouters
gather_facts: false
connection: local
tasks:
- name: enable ipv6 globally
ios_config:
lines:
- ipv6 unicast-routing

- name: configure ospf
ios_config:
parents: router ospf 1
lines: network 192.168.1.0 0.0.0.255 area 0

- name: configure static
ios_static_route:
prefix: 0.0.0.0
mask: 0.0.0.0
next_hop: 192.168.1.1

- name: configure banner
ios_banner:
banner: login
text: |
this is my awesome
login banner
state: present
Run Ansible playbook
root@ubuntu22-server:/etc/ansible# ansible-playbook -i hosts playbooks/initial-config.yaml

PLAY [initial configuration] ************************************************************************************************

TASK [enable ipv6 globally] *************************************************************************************************
[WARNING]: To ensure idempotency and correct diff the input configuration lines should be similar to how they appear if
present in the running configuration on device
changed: [r2]
changed: [r1]
changed: [r3]

TASK [configure ospf] *******************************************************************************************************
changed: [r1]
changed: [r2]
changed: [r3]

TASK [configure static] *****************************************************************************************************
changed: [r1]
changed: [r2]
changed: [r3]

TASK [configure banner] *****************************************************************************************************
changed: [r2]
changed: [r1]
changed: [r3]
PLAY RECAP ******************************************************************************************************************
r1                         : ok=4    changed=4    unreachable=0    failed=0    skipped=0    rescued=0    ignored=0
r2                         : ok=4    changed=4    unreachable=0    failed=0    skipped=0    rescued=0    ignored=0
r3                         : ok=4    changed=4    unreachable=0    failed=0    skipped=0    rescued=0    ignored=0
For each task, it displays the status of the task for each device; the state of the task displays “changed.”
Now run the same playbook, but with the –check option. This option simulates what would happen if the playbook was actually pushed, but without making changes.
root@ubuntu22-server:/etc/ansible# ansible-playbook -i hosts playbooks/initial-config.yaml --check

PLAY [initial configuration] ************************************************************************************************

TASK [enable ipv6 globally] *************************************************************************************************
ok: [r2]
ok: [r1]
ok: [r3]

TASK [configure ospf] *******************************************************************************************************
ok: [r2]
ok: [r1]
ok: [r3]

TASK [configure static] *****************************************************************************************************
ok: [r2]
ok: [r1]
ok: [r3]

TASK [configure banner] *****************************************************************************************************
ok: [r2]
ok: [r1]
ok: [r3]

PLAY RECAP ******************************************************************************************************************
r1                         : ok=4    changed=0    unreachable=0    failed=0    skipped=0    rescued=0    ignored=0
r2                         : ok=4    changed=0    unreachable=0    failed=0    skipped=0    rescued=0    ignored=0
r3                         : ok=4    changed=0    unreachable=0    failed=0    skipped=0    rescued=0    ignored=0
Notice the states of the tasks in the left column, which declares “ok” instead of “changed.” Ansible will not execute a task if the desired state is already achieved.
Conclusion
Setup is now complete! While that completes this initial task, I encourage you to keep learning; search for different Ansible modules and use them in different playbooks. Ansible can be a powerful tool in your automation toolbox!
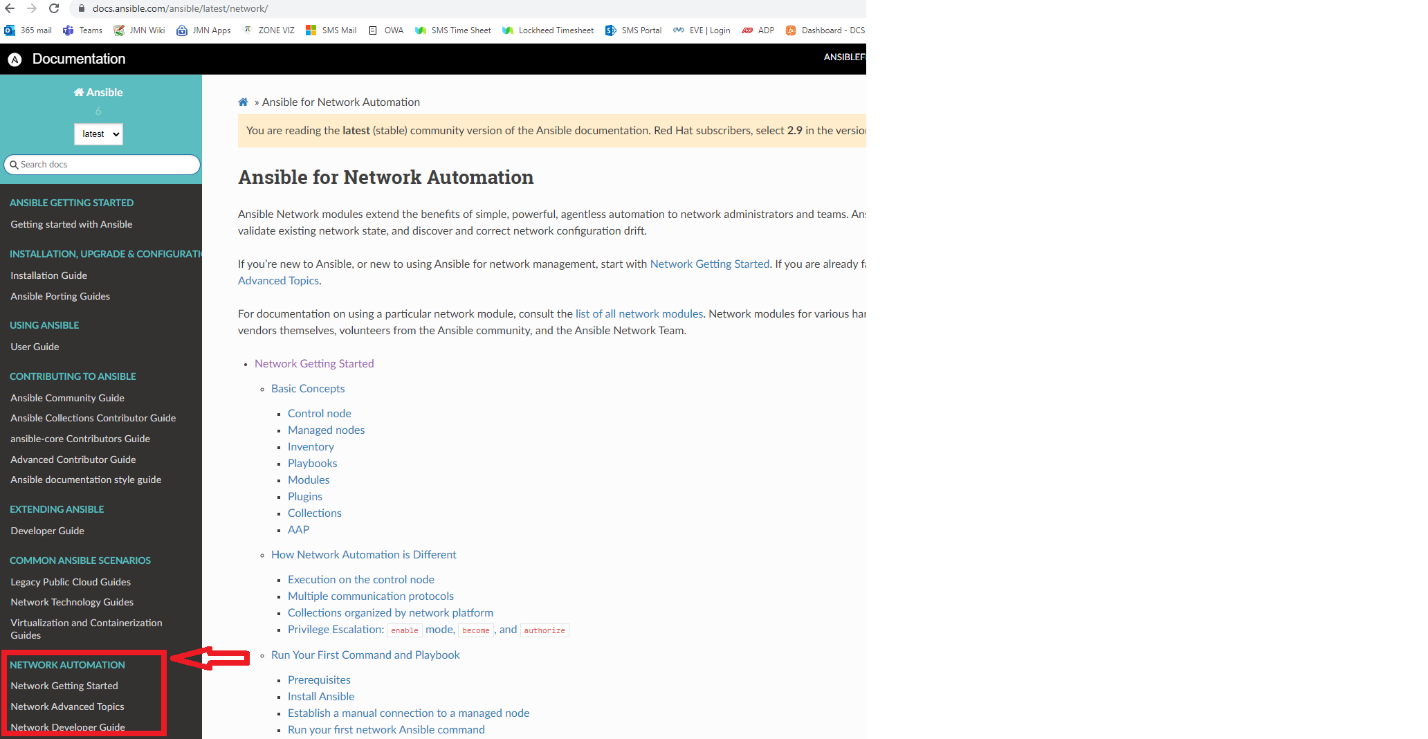
For network engineers just getting started with Ansible, I highly recommend going through the Network Automation resource on the Ansible website.


Litterally a life saver article for who are new to Ansible. Awesome Work and its prety clear. Just follow the steps and it works without any single issue. Thank You. 🙂 🙂